
AirCreate
A VR-based 3D CAD modeling tool aimed at making the product design-focused 3D modeling process easier and faster for product designers and enthusiasts.
Overview
Project details
3D modeling is an essential part of physical product design. Traditional ways of doing 3D modeling on CAD software is difficult to learn and slow to execute for designers with low to intermediate level of experience.
Mixed-reality (MR) has the potential to make this process more intuitive, learnable, and efficient. However, existing MR-based CAD tools lack the ability to make precision-focused models which makes these tools not useful for product designers.
My role
-
Designed the user interaction flows for the application based on user research, haptics, and mixed reality design guidelines.
-
Conducted user interviews to gather user needs and pain points for initial research and also for design iterations
-
Prototyped low-fid prototypes for concept level testing
-
Co-coded the high fidelity prototype on Unity
-
Planned and conducted usability testing of the high fidelity prototype using Oculus Quest
Duration
Aug 2019- April 2020
Team
Anusha Vasudeva, Tae Prasongpongchai, Emily Xue
Tools
User interviews, Contextual Inquiry, Affinity Mapping, Task Analysis, Figma, Unity (C#), Usability testing, Expert evaluation
TL;DR
Goal
-
Exploring if and how Mixed Reality (MR) impacts CAD modeling workflow. For better or worse?
-
Design an MR-based CAD tool that makes CAD modeling easier to learn and execute
Problem space
The narrowed down research question, user needs and pain points gathered from user research -
"
"
How does mixed reality affect the efficiency, learnability, and intuitiveness, of 3D modeling for product design use cases for novice to entry-level product designers?
User needs
-
Precision in 3D modeling is essential.
-
The modeling process should be easy, simple, and fast.
-
The workflow should be intuitive and organized.
Pain Points
-
3D modeling tools are complex and the user needs to adapt to the steep learning curve of 3D modeling.
-
Editing previous work in 2D tools can get complex and confusing.
-
3D modeling takes a lot of time to achieve fluency i.e. the time taken to be well versed with the tool is high.
-
The controls on the VR devices are not intuitive enough and take a lot of time to get the hang of.
-
Although VR is good for visualizing the model, it is not easy to see the overlapping parts in VR.
Final Design
Design Highlights
Precise
Aircreate was designed to tackle precision from the get-go. Unlike other VR CAD tools currently available, users can precisely define dimensions by inputting numbers on the keypad. They can snap to grid or number to suit their accuracy/precision needs
Intuitive
Aircreate focuses on improving the learnability of VR-based CAD tools. The tool has a suite of tried-and-tested suite of intuitive controls that was gathered from user observation and research on haptics and user controls
Scaled modeling
Users can design either in true 1:1 scale mode or zoomed-in modes which allows for precise and easy modeling. Users have more control over the details of the designs as well.
Industry-standard modeling
AirCreate uses the de facto standard CAD modeling paradigm, feature-based modeling. Thus CAD users are already familiar with these concepts and new learners can use this knowledge on other 2D CAD modeling tools as well.
Other feature highlights
Learnability
Flexibility
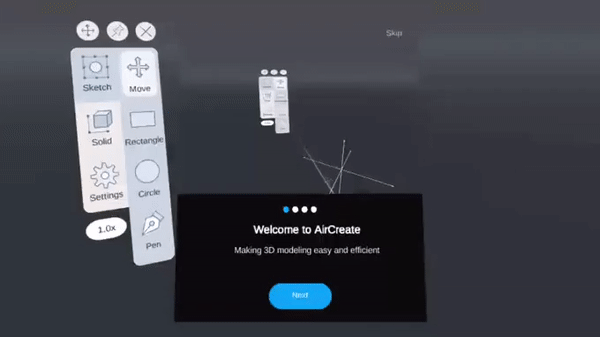
AirCreate has a short onboarding tutorial to help new users to understand the basics of CAD modeling and the highlights of AirCreate functionality.
The application allows users to design in their own way. We recognize that every designer has their own way of modeling designs and hence providing flexible operations was key
Shortcuts
To ensure quicker workflow for experienced users from other 2D CAD tools and also with the tool, the application provides shortcuts.

Tool Preview
Aircreate provides a preview of the functionality of the tool to help new users grasp the concepts quickly and also prevent them from spending too much time on trial and error to model their designs
Process

We started off by conducting user research to understand the user needs, pain points, and validate some of our assumptions. We then designed low-fid paper prototypes to gather feedback on the direction of our design thinking.
Depending on that feedback, we prototyped a mid-fid Figma prototype to gather additional user feedback on haptics, user interaction, and user behavior which wasn't apparent in our first design iteration. Finally, we designed a high-fid Unity application which the user could interact with using an Oculus Quest. This helped gather good user feedback in an environment that the design would eventually be used in.
01
Research
User Interviews (9)
Problem Scoping
Contextual Inquiry (5)
Literature Review
Competitive Analysis
Task Analysis
Affinity Mapping
Problem Definition
02
Design Exploration
Brainstorming
Sketching
Low-Fidelity Design
Paper Prototypes
Concept Testing
User Feedback
03
Design Iterations
Gesture Study
Tool Menu Study
Information Architecture
User Flows
Mid-fid Prototyping
Usability Testing
04
Prototype, Evaluate
Functional Prototype
(Unity & Oculus Quest)
Usability Testing
Expert Evaluation
Research
Assumptions
The team had different levels of expertise in CAD modeling (1 experienced, 1 moderate, and 1 novice) and thus we had different assumptions of how and what aspects of product design, this project should tackle -
-
Product designers would use MR as a creative space to ideate.
-
Precision is essential for engineers while 3D modeling in MR.
-
MR could make 3D modeling easier to grasp for novice users.
-
MR could speed up the workflow for experienced users.
Research Methods
User Interviews

We conducted semi-structured interviews with 9 participants with different 3D modeling backgrounds (product design, 3D content creation, architecture, mechanical engineering) and levels of expertise (novice, experienced, professionals)
Goals
Findings highlights
-
3D modeling is perceived as a way of concretizing previously conceived ideas and refining them instead of ideating itself.
-
Both product designers and engineers care a lot about precision in 3DM
-
Participants felt that 3D modeling has a steep learning curve
-
The needs of novice users were about easing the learning of the tool while expert users expect more advanced, shortcut tools that helps them get things done faster.
-
It was hard for experienced users to articulate their workflows since it had become their second nature. Hence we followed up these interviews with contextual inquiries.
-
The different kinds of group of users doing 3D modeling
-
The needs and the pain points of these users in general
-
Their current use of CAD tools
-
Their perceptions and expectations of doing 3D modeling in MR
Contextual Inquiries

We conducted 5 contextual inquiry sessions with product designers who are experienced with 3D modeling. Each session was divided into two 45-minute sessions where participants were asked to complete 3D modeling tasks once on a 3D modeling s/w of their choice and once on a VR drawing tool Gravity Sketch
Goals
Findings highlights
-
Understand participants’ detailed workflow in 3D modeling.
-
Understand their general impression of VR, their likes and dislikes while trying out an existing VR modeling tool.
-
Note down the unsaid points during the process and probe them more about areas that we might have overlooked during the interview process
-
The workflow and mental model of working in 3D are different from 2D; there is a steep learning curve to start 3DM.
-
We observed that learnability would come from the intuition of the 3D space and direct controls in VR.
-
We learned about the detailed workflow and pain points of CAD modelers. This helped us chalk out a detailed task flow diagram
-
Sense of scale is another expected benefit of using VR.
-
We also observed that participants had issues with precision controls in Gravity Sketch.
Literature Review
Findings highlights
The goal of this literature review was to understand and learn from the current research in the field of MR, and to identify the existing solutions that existed in the market.
"

MR being used in industry settings
"
Unlike 3D sketching and freeform modeling, the area of precision 3D modeling in mixed reality is still in its early stages.
Competitive Analysis
Findings highlights
We researched and compared existing VR tools for 3D modeling as well as industry-standard desktop-based CAD tools for product designers to identify gaps in what already exists areas that our application would tackle.
We found that most mixed reality-based 3D modeling applications had different focuses and most of them were not targeted towards product design use cases.

Non-product-design-focused 3D modeling applications in mixed reality

Existing 3D Modeling Tools for Product Design Use Cases
Data Analysis
With all the data gathered from user research (interviews, contextual inquiries), it was time to collate this data, make sense of it, and chalk out to actionable design goals. We used affinity mapping to categorize all the data.


Top-level themes

Learning Curve
Learning how to make something in 3D is difficult
It takes a lot of time and experience to master 3DM

Collaboration and versioning

Workflow
I have to work collaboratively on my 3DM projects
I need to organize a different version of the design
I want to be able to holistically view my models (all angles, sides, and views)
I want an organized workflow
I make changes in design as I’m modeling, so would want to edit previous work
Task Analysis
This task analysis helped us visualize the entire detailed workflow of product designers while they model their designs. We highlighted the pain points, marked in red, which helped identify potential areas that we could improve upon.

Research Outcome
At the end of the data analysis phase, in addition to identifying the user needs, and pain points we wanted to tackle through our design, we were able to -
-
Narrow down the user groups we wanted to focus on
-
Understand user workflow
-
Define design goals for the project
Narrowing project focus
Based on the interests of the team, the accessibility to the user group, the problems, and needs of a user group we wanted to focus our efforts on, the team decided to narrow down the target user group to entry-level designers and enthusiasts.
The professionals were excluded from the target user group because their workflow was already extremely streamlined over the years. They were well aware of the shortcuts required to work the tool and complete their complex tasks.

Design goals
01
Easy to Learn
The tool needs to be easy to learn. The user should be able to grasp the concept of 3D modeling easily.
04
Comfortable to Use
Since 3D modeling process usually takes hours to complete, the tool should be comfortable to be used in long sessions.
02
Simple But Powerful
The tool needs to be simple and powerful. The user should be able to perform relatively complex tasks with ease.
05
Industry-Standard Modeling
The tool should also comply with industry-standard 3D modeling methods. This is to ensure that new users get adapted to the existing tools easily and the users experienced with other 3D tools can also easily transition into our applications.
03
Allow for Precision
The tool should allow users to create models with precision through intuitive precision controls.
06
Quicker Workflow
It would also be interesting if the tool enables the user to perform the tasks quicker on VR when compared to its 2D counterparts.
Design
1st iteration: Brainstorming
With design guidelines in place, it was time to come up with concepts to comply with those guidelines. We knew that the entire experience had three important components: the menu, and modeling process.

Design alternatives
The goal of this phase of iteration was to manage the fuzzy and ambiguous phase of initial design quickly. We also wanted to begin understanding and learning the high-level principles of designing a 3D modeling app in VR. We wanted to learn what people expect from a 3DM application and if our prototype would worked the way users expected. This would be a good way to get those details quickly and make changes to our plans if there were any major red flags.
An additional challenge that we had to address while prototyping these concepts was making sure these prototypes emulated a sense of modeling in VR. Hence we decided to make low-fidelity paper prototypes and resorted to the wizard of Oz method to emulate the 3D experience.
We wanted the user to be able to create a simple 3D model following feature-based modeling as they would in Solidworks or Fusion 360; 2D sketches to 3D models.

Alternative 1
Menu: The prototype focused on having only a contextual menu without any main menu in sight.
Drawing a sketch: The 2D shapes are drawn free-hand and the shapes are detected automatically
Making 3D bodies from 2D sketches: Select “extrude” from contextual menu & pull arrow visible on the drawn sketch
Editing: The action needed to perform can be chosen by selecting the sketch/body first and then an associated action item from the choices on the contextual menu.


Alternative 2
Menu: The prototype had a three-sided prism menu (as explained earlier) floating in space.
Drawing a sketch: The 2D shape was to be selected from the menu and it would appear on the scene
Making 3D bodies from 2D sketches: The sketch was required to be pulled up using a two-hand pull gesture
Editing: This prototype focused on the editing by selecting from the “feature tree”
Alternative 3
Menu: The menu in this prototype was attached to the user’s viewport (Heads Up Displays)
Drawing a sketch: The 2D shape was drawn by first picking a shape tool from the menu and then dragging the corners of the shape to form the required shape.
Making 3D bodies from 2D sketches: The sketch was converted to a 3D body by selecting ‘extrude’ from the menu and then typing the required number to achieve the required volume.
Editing: This prototype used the controller on one hand for creating shapes and editing them. Users could perform these actions by pressing down the trigger button.


Concept evaluation
We conducted wizard-of-oz testing with a total of 4 participants - two 3D modeling novices and two experienced users. The participants were presented with the three concepts and asked to walk through their interactions with the prototypes as they were trying to complete a task.
The task was to create a 3D shape, as shown, which was given to them at the beginning of the session. Participants held the Oculus Quest controllers in their hands while they performed the tasks and gave us feedback on the design.


User feedback session in progress
3D shape to model in the session
User feedback
Menu
-
Participants liked the idea of having menus visible at all times. It seemed to have made them feel less lost while modeling. They felt that the contextual menus were secondary and saw a value in having them as well.
-
Participants did not have a strong opinion on the position of the menu. They just wanted it to appear in their view to be used.
-
The concept of using only contextual menus did not work. Even though it helped participants know only the available operations and not overwhelming them with irrelevant information, the hidden nature of the menu caused discoverability issues and confusion.
Gestures
-
Different participants used different gestures to perform the same action. However, they all expected to use some gesture to do certain operations such as resizing a shape or extruding a shape.
-
Button mapping and gestures should be consistent throughout the tool. This would also help the user get adapted to the tool quickly and easily.
-
Participants expected to use pull gestures to extrude a 2D sketch.
Workflow
-
They also voiced the need to have visual feedback at specific points, e.g., extrusion dimension/ruler, tooltips explaining the menu items, etc.
-
They wanted flexibility in the order of operations and did not like to be constrained in a way the actions are carried out.
-
Participants needed full control of the shapes they were creating from the start, i.e, people wanted to draw the shapes by themselves, instead of dragging a shape in from the menu and editing later or relying on imprecise hand-drawn shapes.
-
Participants were not sure about the sequence of subtraction.
2nd iteration: Design Details
Given the high-level guidelines we learned from the low-fidelity prototype testing, we started looking into the specifics of two main components of our design: controls and menu. In this mini-study, we aimed to learn what mapping of the controllers would be the most intuitive for the users.
Gesture study
We learned from our previous design iteration that participants had different assumptions on the gestures of the controllers in VR. Hence we conducted two mini studies with a total of 14 participants to determine what actions/gestures were intuitive and non-intuitive to the users

Controls on Oculus Quest, the device we chose for this project.
Goal
We aimed to understand the users’ mental model of control mapping, i.e., what buttons or gestures were intuitive for what kind of actions.
Methodology
Participants held the Oculus Quest controllers without wearing the headset. We presented the participants with a series of tasks in the form of videos of the expected results and a paper prototype, and asked them what kind of gestures or buttons would make sense for each of those tasks.
Half of the participants completed the task sitting down, while the other half completed the task standing. Since users might interact with our final prototype while either sitting or standing, we needed to know whether this had an effect on the control mapping. We hypothesized that when users were standing up, they were likely to use bigger gestures than while sitting down.

One of the gesture study sessions in progress
Study findings
We found that the participants had two different ideas for the gestures for manipulating the view (zooming/rotating). One common gesture we found was the two-hand movement, and the other was using the joystick. We decided to provide both options to the users.
The resulting controller button mappings are as shown on the right
However, there weren't any outstanding differences b/w gestures used in sitting and standing groups

Resulting control mappings based on the study findings
Menu Design
Another integral part of the application that needs to be designed is menu navigation. After experimenting with multiple types of menu in the low-fidelity prototypes, we brainstormed how the menu will look and work in more details. We brainstormed the design of the menu and came up with 4 initial candidates.
Alternative 1
Alternative 1

Tool Belt
The menu items sit on a floating circular “belt” around the user at waist level. This will make the menu easily discoverable to the user.
Tool Belt
The menu items sit on a floating circular “belt” around the user at waist level. This will make the menu easily discoverable to the user.
Alternative 1
Tool Belt
The menu items sit on a floating circular “belt” around the user at waist level. This will make the menu easily discoverable to the user.
Alternative 3
.png)
Radial Menu
The menu items are arranged around a circle in front of the user when called. This might make it quicker to select an item if used with specific interactions, e.g. wrist flick.
Alternative 2
.png)
Floating Window
A tabbed menu floats in the space and follows the user position-wise only. Leveraging the “window” mental model, this menu should be familiar to most users.
Alternative 4
.png)
Artist’s Palette
The menu is attached to one of the user’s controllers. This is one of the most common approaches for menus in VR in other applications.
Menu Design
We selected alternatives 2 “Floating Window” and 4 “Artist’s Palette” to be tested further. We added menu interactions such as pinning and minimizing and created a functional prototype in Unity to test and compare the two.

User feedback
We tested the prototype with 7 participants with varying experience in 3D modeling and VR. After trying the prototype, we asked them to rate and give comments about the designs.

Revised menu design
Informed by the user study, the final interaction design of the menu was modified from the “Floating Window” design in the following ways:
-
When unpinned, the menu now automatically follows the direction that the user is facing by repositioning itself when it has been out of the user’s field of view for 1 second.
-
When pinned, the menu will always rotate itself to face the user regardless of the user’s position in 3D space.
-
A move button is added to the menu. The user can use the button to drag the menu around.

Mid-Fidelity Prototype
With the learnings from the 1st iteration and the two informative mini studies, we moved on to the second design iteration. In this iteration, we created a better-defined, mid-fidelity prototype using Figma and wizard-of-oz method
Design process
We prototyped a clickable Figma prototype just enough to enable the user to create two 3D models aka benchmark tasks that we would test out during the user feedback sessions. Hence we took a bottom-up approach to this design process as we had to first get feedback on the menu interactions, gestures and the worklflow as our MVP. Working on the shortcuts, elevating the experience would be our P1.
Mapping out user flow
Since there were different ways to make a 3D model, we mapped out various possible user flows before creating the prototype. This process also helped us think through each step of the 3D modeling process. Thus we were able to settle on the details of interaction design, such as users’ navigation through the prototype, and how each step would look on screen.


Information Architecture
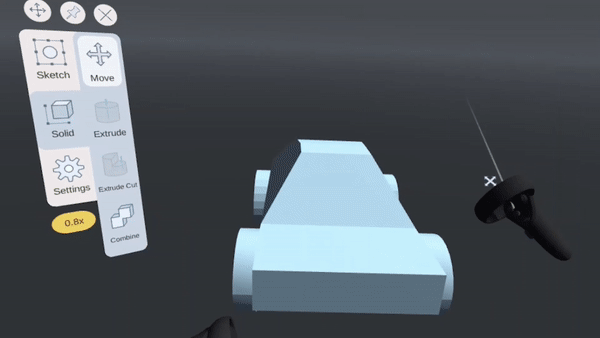
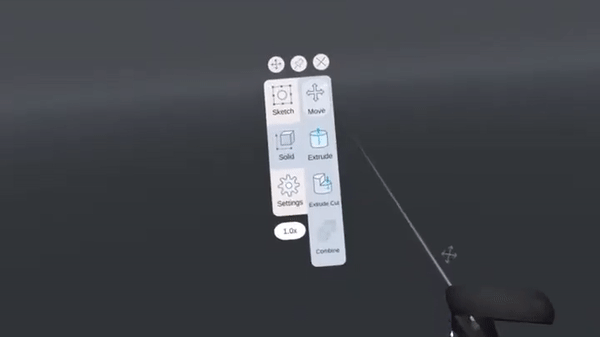
We had to also decide on the organization of the tools in the menu bar. We divided the 3D modeling features into Sketch and Solid, which is a concept adapted from existing feature-based 3D modeling tools. Users start with 2D sketches and build 3D solids upon those sketches.

Feature highlights
Overview: We decided to have a 3D plane for building models on and to ensure visibility and to reduce confusion, we decided to have the menu visible at all times on the user's view. We also had contextual menus as a secondary option that would be presented to the user as and when he took actions on the sketches/models

Plane selection
Users can select a plane to create a 2D sketch. They can select the plane before or after they have chosen a 2D sketch tool
Contextual menu
After clicking on an existing shape, a contextual menu with common operations will pop up on the screen.


Visual keypad
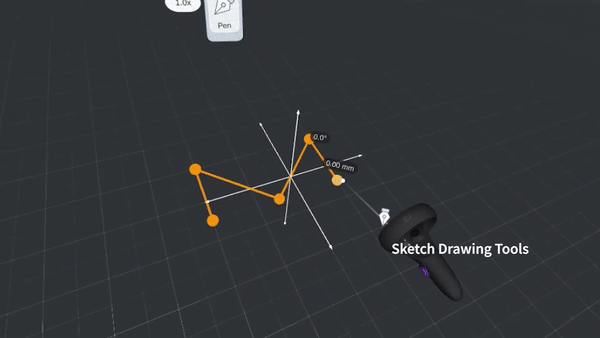
A numeric keypad to let users input precise dimensions when creating shapes.

Extruding a sketch using the arrow
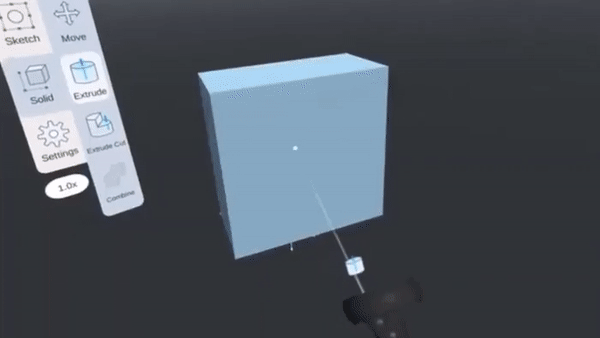
A selected 2D sketch will be highlighted along an arrow. Users can click and drag this arrow to extrude the sketch.
Prototype testing & feedback
Overview: We tested the clickable Figma prototype with a total of 4 participants. Two of them had 3D modeling experience, while the other two were new to 3D modeling.
Participants were asked to complete the two 3D modeling tasks using our prototype. Since our prototype was run on a desktop, we projected the prototype to a large projection screen to help mimic the feeling of being in a VR space. Participants held the VR controllers and gestured in front of the projection screen while they walked us through the interactions and throught process.


Feedback highlights
What worked?
-
Overall, participants thought this tool was easy to learn. The time taken to complete the second task was less than half of the time taken to complete the first task.
-
Participants liked some of the “shortcuts” in the prototype, as it made the process easy to grasp and faster to execute actions.
What needed work?
-
Novice participants had difficulty understanding the structure of the menu (sketch vs solid) and some of the options on the menu. They were not familiar with 3D modeling terminology, e.g., “extrude cut” and “ trim”.
-
Plane selection was confusing and non-intuitive to the participants due to lack of affordances
Prototype limitations
-
From this testing, we noticed that there were so many other ways to complete the 3D modeling tasks.
-
Due to the limitations of Figma, the prototype was not flexible enough and participants had to follow the pre-designed user flow to complete a task.
-
This sometimes led to confusion and frustrations.
3rd iteration: Hi-Fidelity Prototype
In this final iteration of this project, we made design changes to address those concerns and start to create a functional prototype that would allow us to test the design in deeper detail.
This iteration of the prototype is developed in Unity (C#). The prototype was installed on an Oculus Quest headset and works with Oculus Touch controllers. Building a prototype in virtual reality would allow us to test design ideas that we were not able to test earlier such as grid snapping, gestures for zooming in/out, and other interactions with high interactivity. Developing a working application also helps us mitigate the problem of exponentially growing user flows we faced when making the prototype in Figma.
What changed?
01
Contextual affordances
One of the prominent feedback from the previous iteration was the lack of affordances and the confusion the new concepts of 3D modeling and the jargons new users faced.
We decided to add features such as onboarding cards, action prompts, and animated tool previews, to address this.

.png)
.png)
02
VR-Only Interactions
-
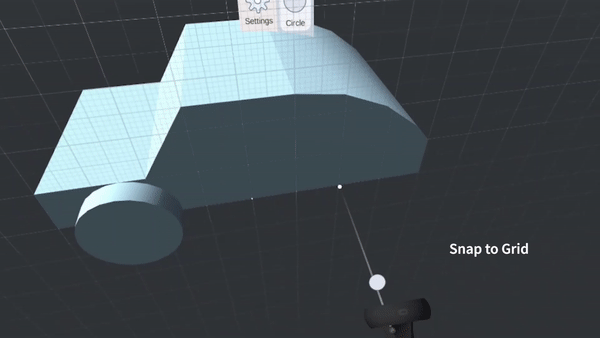
Grid snapping: When drawing, dimensions would automatically snap to certain intervals (5 centimeters by default).
-
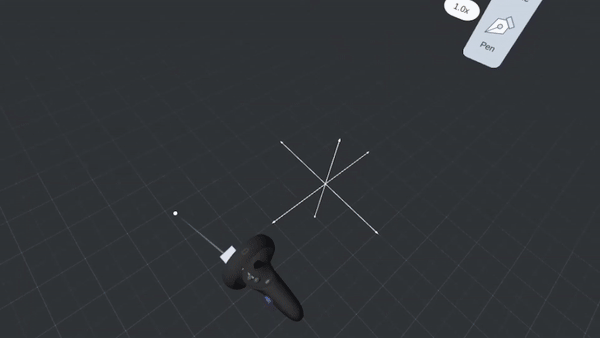
View Gestures and Joystick Controls:
Users can zoom, rotate, or pan the view by holding the grip buttons on both hands and move them. The joystick can also be used to zoom and rotate the view.
03
Visual Design
We looked into the visual design of the application and created visual styling and an icon set for the menu.
In previous iterations, the background of our application had mostly been white, however, having an all-white in VR background can be too bright for the user. Therefore, we decided to change to a dark background in this prototype.
We also changed the background with a clear-cut horizon and a contained space (as seen in the menu study) to a gradient background with a slightly brighter tint to make the environment feel less claustrophobic.


04
Detailed Tool User Flows
With the higher level of fidelity in the prototype, we moved from designing task-based user flows to refining the user flows for each tool. This not only helped us visualize how each tool will work in detail but also helped to make the prototype development process easier.
Tackling new VR prototype issues
Transitioning from the prototyping platform to VR led us to discover some unforeseen problems in our design because these interactions were not simulatable through our previous prototyping methods.
Context Menus Behind Objects
Since the context menu has to live in the 3D space, it might show up behind other objects, making the menu not visible to the user. To solve this, we made the application render the menu last, i.e., on top of everything else, regardless of its distance in the scene.

The Menu Through a Plane
When a plane is selected, it will span out infinitely. If the menu stays behind the plane when it is selected, the user would not be able to point at the menu because the plane was in the way. To solve this, we programmed the plane to let the user point through it when the user is pointing at the menu.

UI Became Smaller with Distance
Naturally, objects that are further away look smaller. This makes UI elements at distance hard to read and hard to aim at. To solve this issue, we made the size of the UI elements adaptive to its distance from the user. We also made the UI elements rotate themselves to always face the user.

Object Occlusions
Objects that are irrelevant to the task might obstruct the view while performing other tasks. To solve that, we decided to make the irrelevant object transparent when the user is pointing at another object behind that object.

Final Prototype
The Final design of our application, AirCreate, is a VR-based 3D CAD modeling tool. The application focuses on making 3D modeling easier to learn while still complying with industry-standard modeling paradigms (feature-based modeling) and allowing users to create precision-focused designs.
Tools walkthrough
Creating a basic shape 1
Creating a basic shape 2
Modeling a toy car
Evaluation
Expectation
In order to evaluate the prototype, we planned two research activities: usability testing and expert evaluation. User testing help us understand how users use the product and uncover usability issues, while expert evaluation is an ideal method to inspect every aspect of the prototype and spot design errors.
Usability Testing: We planned to recruit 8-10 participants from all the target user groups and expertise levels. Participants will be asked to perform a couple benchmark tasks on both AirCreate and Fusion 360. SUS scores would be collected and compared between the two.
Expert Evaluation: We planned to conduct expert heuristic evaluation with 4 experts in both CAD modeling and VR to spot design errors and get feedback on how to further improve our prototype.
Reality
The health concerns caused by the COVID-19 situation hindered us from conducting in-person user testing. Therefore, our evaluation plan needed to be changed. We conducted a “discount” version of our original evaluation plans.
Usability Testing: Since we were not able to let participants come to the lab because of social distancing, we could only reach out to our roommates who fit the description of “novice” user group. A total of 3 individuals participated.
All of the participants did not have 3D modeling experience. Because of the limitation of such a small sample size, the results are not comprehensive and might not represent all the target users.
Expert Evaluation: As a workaround, we recorded 3 video clips of us exploring the prototype and completing the two 3D modeling tasks. We then shared these videos with the participants, and they gave us feedback based on the video clips.
We recruited a total of 4 participants. One of them had 6 years of professional experience as a mechanical engineer. One was a faculty member teaching 3D modeling courses in a university. The rest of the participants were graduate students who had taken classes in 3D modeling.
Findings
Since two of the experts only watched the demo videos without trying the prototype, they were only able to give high-level feedback. Therefore, the results below are only preliminary findings. More in-depth sessions need to be conducted to get more detailed results.
What worked?
-
Overall, all participants thought the prototype was easy to learn. They appreciated the onboarding tutorial and the tooltip of each menu option. They thought that the tutorial was concise and helpful.
-
To participants, creating 3D models in a 3D environment "made more sense" than on a desktop.
-
VR allowed the participants to view the model from different angles with ease.
-
The system made sense to them for the most part. After participants understood how the prototype worked, they were able to create 3D shapes quickly.
-
Participants thought that the UI design was clear, and the menu design was straightforward.
What needs improvement?
-
Some features and button shortcuts have discoverability issues.
-
Working in VR is currently not as physically comfortable as on a desktop.
-
Based on this limited pool of participants, they completed the tasks slower in VR than in Fusion 360.
-
Experts and participants both wished they could create sketches on more arbitrary planes.
-
The prototype had reliability issues.
Where Do Participants See Themselves Using This Tool?
-
All participants thought that they would use this tool in the early stages of modeling. E.g., defining the form of a 3D model. For the complex details, they still preferred using desktop software.
-
Participants thought that this tool was suitable for making quick and simple models. Two participants mentioned using it for 3D printing.
Conclusion
Working on this project has shown us that MR has a unique and highly promising place in CAD workflows.
Though with the limited data from the final evaluation, we have learned that there are benefits of using MR in 3D CAD such as learnability, usability, and natural, true-scale model visualization. Users also seemed to perceive such tasks in MR as intuitive, hands-on, and fun when compared to their 2D counterparts.
However there are still a few elements that are outside the scope of our project that need to be addressed in order for MR to take over the product design process. The unfamiliarity with VR, hardware limitations of VR, the steep learning curve of VR products are some of the aspects that are preventing users from using MR applications to their full capacity.
Next Steps
We need to conduct more thorough in-person sessions to get more conclusive results about the usability and efficiency the design.
For AirCreate to become a commercial product we need to allow designers to make more complex shapes such as sweep, revolve, loft, etc.
Implementing hand tracking into AirCreate might change the interaction design dramatically. Additionally, the need for a collaborative workspace for 3D modeling as MR appears to be a good medium for visualizing 3D designs.
Learnings
Designing for MR
I got to work on building mental models for new platforms and how important the educational elements, e.g. tutorial and prompts, are in interaction design.
Designing for a creative tool
AirCreate is a creative tool in its nature with branches in every step of the user flow. Unlike linear task-based tools, design of a creative tool demands a much more flexible user flow
Design by learning underlying tech
Unlike design work that are based on more well-established platforms such as mobile applications, designing for MR still demands a deep understanding of how the technology works and the design constraints that come from the nature of the technology.